Documentation and API reference for the #retroPy MicroPython retro game engine and #rp2040 consoles
[updated for retroPy beta 0.1 with RP2040]
While the core game engine is written in c and handled at the machine level to ensure high frame rates, we have exposed some key functions in micro-python as a library for user control and access.
To use the library, we'll need to import it and ensure we have the minimum basic setup as shown.
    from RetroPy.retroPy import rpy, kb, draw, gameObj, LoadSpriteStr, LoadSprite, sprite

    def Update(dt):
        pass

    def Draw(dt):
        pass
    #==================================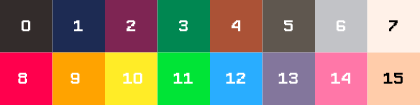
rpy.run(Update, Draw)By default, retroPy uses PICO-8's 16 colour palette. Every number (0-15) represents a colour.
.clear(color)
Clears the screen with an optional colour. By default, the value is 0 which is black.
Example:
    def Draw():
        draw.clear()
Alternatively:
    def Draw():
        draw.clear(1) #fill the background with dark blue
.text(string, x, y, color)
Write text to screen at position x,y with an optional specified colour
    def Draw():
        draw.text("Hello World",50,50,7)
By default, retroPy uses a monospace 8x8 font size. Position x,y is the top left starting position.
.currColor
Get/Set current palette colour for use in draw methods
    def Draw():
	draw.clear(0)
	draw.currColor = 7
        draw.text("Hello",50,50)
draw.text("World",50,60) While drawing primitives is more costly and slower than drawing a sprite, they have their uses. retroPy supports the following primitive draw functions.
.pixel(x, y, color)
Draw a pixel at position x, y with an optional specified colour
    def Draw():
	draw.clear(0)
	draw.currColor = 7
        draw.pixel(10,10)
.circle(x, y, radius, color)
.filled_circle(x, y, radius, color)
Draw an outline circle or filled circle given the center-point and radius, with an optional specified colour
.line(x1, y1, x2, y2, color)
Draw a line given the starting and ending x,y position, with an optional specified colour
.hline(x, y, w, color)
.vline(x, y, h, color)
Draw a horizontal/ vertical line given the starting x,y position and length of the line, with an optional specified colour
.rect(x, y, w, h, color)
.filled_rect(x, y, w, h, color)
Draw an outline or filled rectangle, with an optional specified colour
.sprite(ndx, ptr, x, y, flip)
*Draw a sprite image with the starting index, located at the provided pointer at position x,y with an optional flip value. Used for drawing images that do not require the functionality of that of a game object. *
	ptr_chicken=(LoadSpriteStr(Bird.chicken))
    def Draw():
	draw.clear(0)
        draw.sprite(0,ptr_chicken,120,120)
Refer to segment on loading sprites for more info.
retroPy supports 2 methods of storing and loading sprites.
In the Sprites folder, you will notice 2 types of sprites assets.
- .rs4 files** (Recommended for speed and memory efficiency) retroPy's own 4-bit retroSprite files. Images are stored in a 4-bit colour format.
- .py "Sprite String" files** (Slower and larger files) Sprites and animation frames are stored in strings of numbers (representing palette colours).
To load rs4 sprites, provide the file path to the rs4 file.
    from RetroPy.retroPy import rpy, LoadSprite
    p_fire = LoadSprite("Assets/fire1.rs4") #<< rs4 file
To load sprites stored in python Sprite String files, import the .py file as a library.
    from RetroPy.retroPy import rpy, LoadSpriteStr
    from RetroPy.Sprites import heart
    p_player = LoadSpriteStr(heart.heart) #<< python string file
Where Sprites is the folder name, and heart is the python file name (heart.py), followed by the variable named heart.
retroPy comes with standard assets for you to quickly get started.
Game Objects are objects that have native support for what we consider essential in a game.
retroPy natively supports game objects with the following:
- Animation (Sprite animation cycle)
- Physics (eg. Acceleration, Velocity)
- Colliders
retroPy is sprite-centric. All sprites are treated as a game object. This includes the characters, items, special effects and game terrains.
To create a game object, we'll make use of the gameObj class like so.
player = gameObj(p_player, pos_x, pos_y, flip_duration, speed_x, speed_y)The gameObj class requires a few things.
p_player- pointer to where the sprite ispos_x,pos_y- starting x, y coordinates of the game objectflip_duration- (if sprite is an animation) how long(ms) to show each frame before showing the next (leave as 0 if static image)speed_x,speed_y- how fast (pixels per second) to move the sprite along the x and y axis
The main concept to using the game object is a simple 3 steps.
- Load sprite
- Create game object
- Use in Update/Draw Loop
As an example, let's create a cat character and get it to appear in the bottom-left of the screen.
cat = gameObj(p_cat, 10, 220, 200, 0, 0)We'll place that line into the basic setup like so.
from RetroPy.retroPy import rpy, gameObj LoadSpriteStr
from RetroPy.Sprites import cat

#1. Load sprite image into memory
p_cat = LoadSpriteStr(cat.idle)
#2. Create game object
cat = gameObj(p_cat, 10, 220, 200, 0, 0)

#3. Use in update/draw loop
def Update(dt):
	cat.update(dt) #update required for animation. (not needed for static images eg. terrain.)
    pass

def Draw(dt):
    rpy.clear()
    cat.draw()
    pass

#====================================================
rpy.run(Update, Draw)
You should see the cat on the screen with an idle animation like so.
.pos(pos_x, pos_y) .pos_x .pos_y
Get/ Set the (top left) position of the game object
Example:
    #set the player position to coordinates (0,0)
    player.pos(0,0)
alternatively,
    player.pos_x = 0
    player.pos_y = 0
.mid_x .mid_y
.bot_x .bot_y
Get/Set the middle (center point) or bottom (bottom right) position of the game object
Example:
    player.mid_x = 7
    player.mid_y = 7

    player.bot_x = 15
    player.bot_y = 15
.speed(speed_x, speed_y) .speed_x .speed_y
Get/Set the speed (pixels per second) of the game object along the x and y axis
Example:
    #move the player to the right at a speed of 20
    player.speed(20,0)
Alternatively,
    player.speed_x = 20
    player.speed_y = 0
.acc(acc_x, acc_y) .acc_x .acc_y
Get/Set the acceleration of the game object along the x and y axis
Example:
    #set an upward acceleration of 10
    player.acc(0,-10)
Alternatively,
    player.acc_x = 0
    player.acc_y = -10
.dist(gameObj)
Get distance in pixels from another game object
Example:
cat.dist(food).moveTowards(x, y, speed, dt)
Move game object to a given coordinate at a given speed.
Example:
    def Update(dt):
        cat.moveTowards(food.pos_x, food.pos_y, 20, dt)
        pass
.bound(xmin, xmax, ymin, ymax)
.bound_x(xmin, xmax)
.bound_y(ymin, ymax)
Set movement boundaries of game object. Game objects will not move past these boundaries.
The following game object members are specific to the sprites used in the game object.
These are especially useful for changing sprite properties on the fly.
.sprite(ptr_Sprite, flip_duration)
Set pointer to sprite to be used.
Example:
    if kb.A_down:
        cat.sprite(p_cat_attack, 200)
.currNdx(ndx)
Set current index of sprite to be used. Pick index frame from animation.
Example use: Ending off a moving sprite animation to a final static image.
.flip(val)
Flip sprite horizontally and/or vertically
Flip Options:
- 0 : no flip
- 1 : flip sprite horizontally
- 2 : flip sprite vertically
- 3 : flip sprite both horizontally and vertically
Example use: Changing player walking direction, without needing separate sprites for each direction.
    if kb.right_down:
        cat.sprite(p_cat_run,200)
        cat.speed_x = 30
        cat.flip(0) #no flip. cat sprite is already facing right
    if kb.left_down:
        cat.sprite(p_cat_run,200)
        cat.speed_x = -30
        cat.flip(1) #flip sprite horizontally. In this case, from right to left
.mode(val)
Sprite animation display mode
Mode Options:
- 0 : (default) Continuous frame cycle animation
- 1 : Cycle through animation frames once and disappears (Good for special effects eg. Explosions)
- 2 : Cycle through animation frames once, stops animation at last frame
.flipDuration(msec)
Set how long(ms) to show each frame before showing the next frame in the animation (leave as 0 if sprite is static)
Colliders are useful for troubleshooting during the development process of the game, and for checking if the game objects have collided into other game objects like walls/ enemies/ items. Colliders are part of game objects.
.drawCollider(color)
Draws a rectangle in a given colour to represent the collider. By default, the collider is the size of the sprite.
Example:
    def Draw(dt):
        draw.clear()
        cat.draw()
        cat.drawCollider(3)
        pass
.collider(gameObj)
Returns True if the game object collided with another game object.
Example:
    def Update(dt):
        food.update(dt)
        cat.moveTowards(food.pos_x, food.pos_y, 20, dt)
        if cat.collider(food):
            print("Collide!")
.colliderEx(gameObj)
Similar to collider with extra info
.colliderPt(x, y)
Check if a point is inside the gameObj collider
.resizeCollider(x, y, w, h)
Resize the gameObj collider.
Example use: AOE damage
.collider_xy(gameObj, x, y)
Check if gameObj collides with another gameObj at position x,y
The retroPy game engine natively supports the handheld game console's 8 button inputs.
Obtaining the 2 states of a button press - Down & Up (release) is easy.
Example:
    def Update(dt):
        if kb.right_down:
            cat.sprite(p_cat_run,200)
            cat.speed_x = 30
            cat.flip(0) #no flip. cat sprite is already facing right
        if kb.left_down:
            cat.sprite(p_cat_run,200)
            cat.speed_x = -30
            cat.flip(1) #flip sprite horizontally. In this case, from right to left
        if kb.left_up or kb.right_up:
            cat.sprite(p_cat,200) #set back to idle animation
            cat.speed_x = 0
Full list below.
To get the button Down (pressed) or Up (released) state, check the corresponding buttons in the update loop.
.left_down .left_up
.right_down .right_up
.up_down .up_up
.down_down .down_up
.A_down .A_up
.B_down .B_up
.Tleft_down .Tleft_up
.Tright_down .Tright_up
.quit()
Quits the run loop
.run(Update, Draw)
*Run Update & Draw loop